Zonal marking or man marking? All eight Bolton corners reviewed
Written by Dan on March 7, 2011
The debate surrounding the pros and cons of zonal marking versus man marking at set pieces will doubtless rage on, but most of the big teams will continue to use a combination regardless. Indeed, the argument about what constitutes zonal rather than man marking will be no more likely to reach consensus any time soon.
All of that is outside the scope of this post, I’m simply going to go through each of Bolton’s eight corners and translate what I saw on video to the usual diagrams. You can make your own mind up.
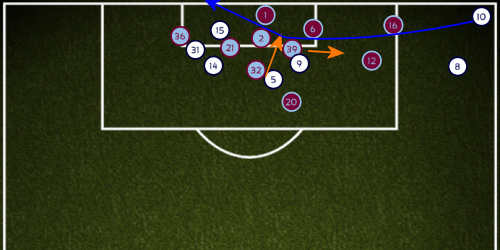
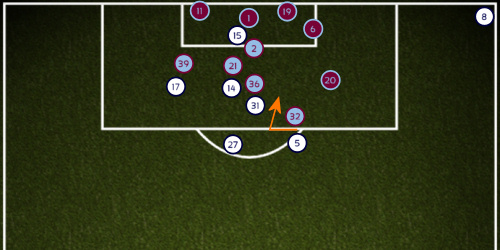
What I will say, if Bolton had been kind enough to line-up for a corner in this fashion, as you’ll see from the analysis that follows, you would probably expect Villa to respond thus:
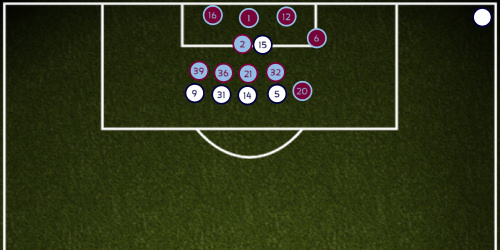
Daniel Sturridge (#15) would take up the spoiler role, making himself a nuisance in front of Brad Friedel, Luke Young (#2) would not be very far away, mopping up any loose balls dropping in.
Bolton’s better headers of the ball are unlikely to make life so easy by lining up in such a tame manner, but had they done so I think you would have seen Nathan Baker (#32) keeping his eye on Gary Cahill (#5), Ciaran Clark (#21) nullifying the aerial threat of Kevin Davies (#14), Kyle Walker (#36) matched up against David Wheater (#31) and Darren Bent (#39) left to pick up Johan Elmander (#9).
Makes sense, right?
Well, Bolton scored directly from two corners and indirectly from a third, so let’s see how they did it.
Corner One: 1st minute
First of all, question should really be asked about why we were facing a corner 30 seconds into a game we kicked off.
The diagram below shows the position of the players as Stuart Holden prepared to take the corner as the TV angle allowed me to see. Darren Bent was still coming back to mark Elmander, Clark was already tight to Davies, but Walker and Baker were in conversation as they exited the frame to the left.
Cahill and Wheater were not on screen, but the cut shot that followed showing Cahill in the foreground jockeying for position suggested that bother players weren’t far away from the D.
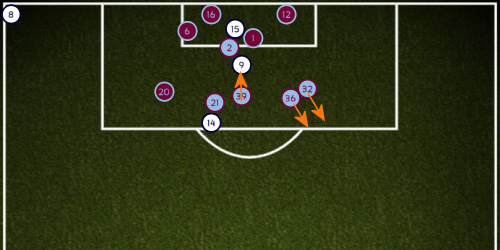
Holden’s inswinger was met by Wheater, who now had Walker in tow, and his nod down got stuck under Clark’s feet as he prevented Davies getting on the end of it. Luke Young was able to clear the ball away for a throw-in.
Corner Two: 14th minute
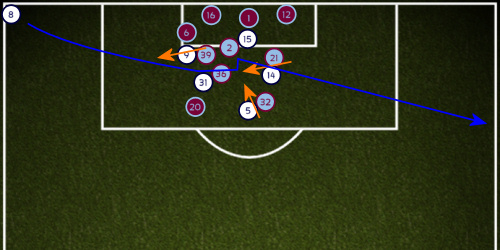
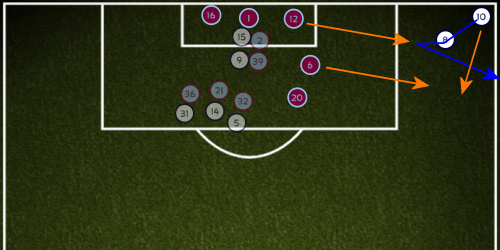
The second corner was interesting. It was on the opposite flank and Martin Petrov went over to take while Stuart Holden initially lurked just outside the box. Elmander took up a position in the six yard box with Bent for company while Bolton’s other three aerial attackers hung back, their markers provided a mirror image.
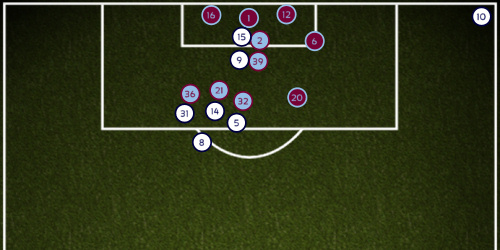
And then Holden made it interesting by jogging over to provide a short corner outlet.
Villa responded by despatching Marc Albrighton from the near post and Stewart Downing to close down the short corner. As it was, Holden’s cross was blocked by Albrighton and the ball went out for a throw-in, but it should be noted that Delph remained guarding his post so far as I could tell.
I’ve no idea of the positioning of the other players once the camera angle cut to the action near the corner so I’ve left them in their previous positions, slightly transparent.
Corner Three: 43rd minute
Elmander once again took Bent to the six yard box while Davies, Cahill and Wheater all hung back, monitored by Clark and Baker as Walker jogged over from his position after conceding the corner.
No one paid much attention to Martin Petrov.
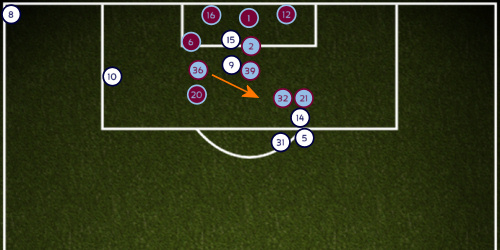
Holden fed Petrov and he was able to take his time shaping a ball to the far post as Downing and Reo-Coker looked to close him down.
Cahill had made a near post run with Baker for company, Wheater hung back and made a late run into space in the middle, hoping to receive a nod down, Davies drifted wide as Sturridge challenged for the ball, but was beaten in the air by Albrighton.
Corner Four: 46th minute *Goal*
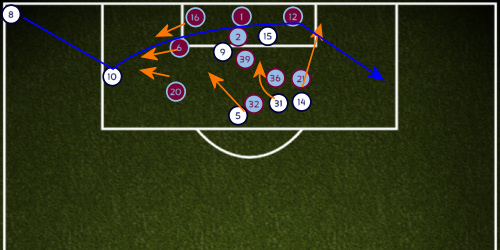
The crucial set piece, a minute into the two added minutes at the end of the half. Again Holden went over to the corner to give Petrov a short outlet, but this time it was a dummy and Petrov sent the ball in himself.
Crucially, Albrighton and Delph both left their posts to close the short corner option down. Cahill hung back on the edge of the box alone, watched by Baker.
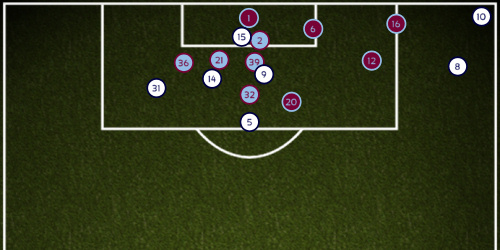
Cahill timed his run perfectly to meet Petrov’s inswinger, beating off attention from Baker, and nodded diagonally to the far post.
Could Delph have prevented the ball going in if he’d been on the post? Possibly, but the ball did have some pace on it. We can’t know for sure, but it should be questioned why he went to shut down the short corner routine and Downing stayed in the six yard box.
Corner Five: 73rd minute
With Petrov now substituted (replaced by Lee Chung-Yong #27), Holden would take the remaining corners. Elmander had also been replaced by Ivan Klasnic (#17) who would go on to score the winning goal.
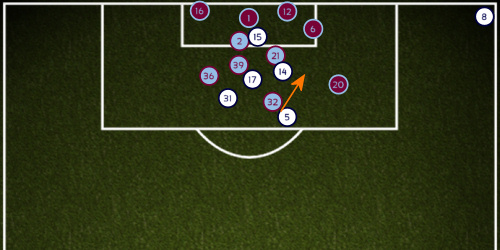
Cahill made a late run to the near post, but the ball drifted over the heads of almost everyone, only Wheater had drifted off the back and attempted to nod the ball back into the crowd. Reo-Coker was there to head clear.
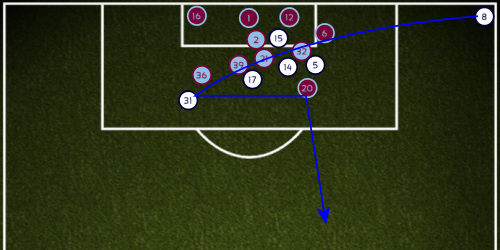
Corner Six: 74th minute *Goal*
Clark and Davies jockeyed for position in the middle while Cahill and Wheater again hung back, Cahill prowling laterally before making a run into the centre to meet Holden’s cross.
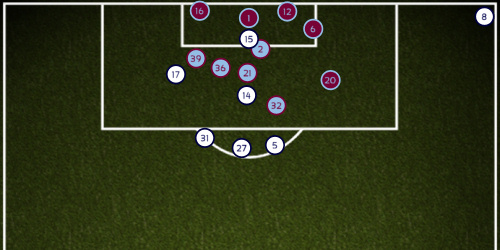
Cahill lost Baker on the way in and headed powerfully on target, Brad Friedel pulling off an excellent save only to see the rebound fall straight back to Cahill who continued his run to the left. Cahill volleyed in despite Delph and Baker attempting to charge down the danger.

Corner Seven: 85th minute
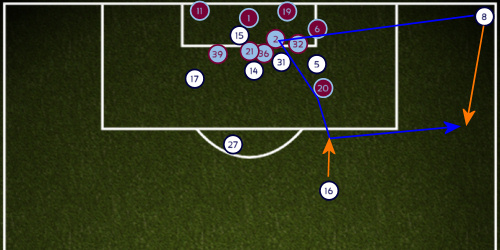
Again Cahill held back with Nathan Baker as his shadow.
The most interesting thing from this corner was Brad Friedel’s reaction as he casually glanced toward the far post only to spot no one there. Since Delph and Albrighton had substituted by this point it fell to Stiliyan Petrov and Gabby Agbonlahor to fill in. Apparently Gabby needed a not so gentle reminder.
This time Luke Young got on the end of the cross, but his header looped up high and Reo-Coker helped it clear of danger. Substitute Mark Davies picked up the loose ball and sent it out wide to Holden again, but his cross was charged down for another corner by Petrov.
Corner Eight: 86th minute
The final corner would eventually lead to the winning goal after a couple of failed clearances.
Bolton made no special effort at the corner and actually lined up pretty much as depicted in the theoretical line-up used in the very first diagram above.
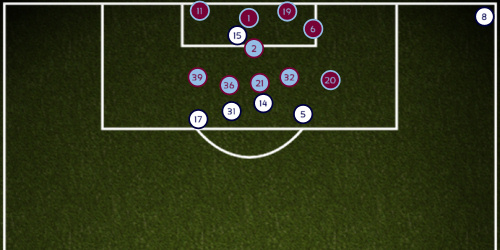
Darren Bent stretched to get his head on the ball as Ivan Klasnic lined up a volley at the far post. Walker and Klasnic chased the loose ball, Klasnic won and sent in another cross which was cleared by Baker.
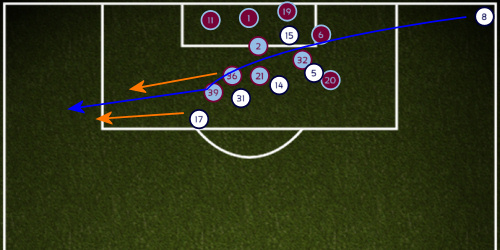
Holden’s attempted cross was blocked by Baker again, the rebound ending up with Sturridge who floated a hopeful ball into the area. Walker appeared to beat Wheater in the air, but nodded only as far as Klasnic who pounced on the loose ball and fired in from close range.
Game Over
And that’s it. Unfortunately, on the two occasions the ball got anywhere near Gary Cahill, he not only manage to beat Nathan Baker to get on the end of it, he also got his efforts on target. Three times as it would turn out.
It remains a possibility, and no more, that Fabian Delph may have prevented the first goal, but we can’t ever know for sure.
The third goal was the result of the familiar sight of not clearing our lines properly. I said in the initial match report that it was second phase, it was actually more like fourth, but the principle remains.
So, are there any management failures here? Not in my opinion. I don’t want to single Baker out, he’s outperformed my expectations at this level, it just remains a basic fact that he was clearly tasked with taking care of Cahill and on the two occasions it mattered most, he was beaten by the more experienced player.
With all due respect to Baker, had Dunne, Collins and Cuellar not all been injured he probably would not have been on the pitch. However, not one of those three can offer any kind of guarantee of not being beaten themselves, but you’d be justified in feeling more confident.
Ultimately, you don’t win many games by conceding three goals, it’s true, but we shouldn’t lose sight of how many quality chances were squandered at the other end. This game should have been dead and buried even before Ashley Young stood over the ball at the penalty spot.